This post is going to be quick start guide for using the Intel Galileo with the "IoT Linux" image.
First you'll need to download the image from here.
Click on "SD-Card Linux Image " and then save the image.

Next, we need to load the image onto a micro SD card. Click on the link that applies to you (in terms of the host system you are using) and follow the instructions.
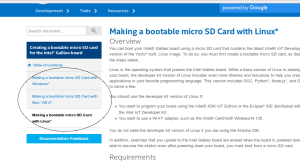
Note: You'll need the card with minimum of 2 GB capacity.
Getting to the console:
Using console will give you direct access to the Linux system that you've just installed. The easiest way to have access to the console is via the serial channel.
For this, you'll need a USB to UART-TTL cable like this or if you any other cable
like these, just make sure you connect the three lines TX, RX and GND.
First you'll need to download the image from here.
Click on "SD-Card Linux Image " and then save the image.
Next, we need to load the image onto a micro SD card. Click on the link that applies to you (in terms of the host system you are using) and follow the instructions.

Note: You'll need the card with minimum of 2 GB capacity.
Getting to the console:
Using console will give you direct access to the Linux system that you've just installed. The easiest way to have access to the console is via the serial channel.
For this, you'll need a USB to UART-TTL cable like this or if you any other cable
like these, just make sure you connect the three lines TX, RX and GND.
On converter On Galileo
GND <---------> GND
TXD <---------> RXI
RXD <---------> TXO
If you have the Grove Starter kit, you can use serial cable that comes with it.
Connect the black wire end of the cable to "GND" on the Galileo.

Use any of the serial terminal emulator programs to login to the Galileo. On Linux, you can use putty, gtktrem, minicom on Windows you can use Putty, RealTerm,Tera Term.
Following instructions apply to putty
On Ubuntu, you can install putty by running the command
For Windows, download putty from here.
Connect the USB converter cable and run the following command to know by what name the cable got recognized in the /dev/ folder.
For example, in my case, it got recognized as ttyUSB0. Some converters might show up as ttyACM instead of ttyUSB. In that case, you'll have to use ls /dev/ttyACM* instead of the above command to find out the device file.
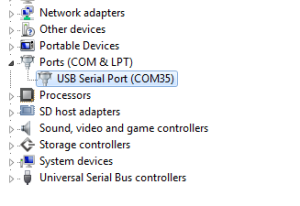
If you are on Windows, right click on "My computer->device manager->ports" and note down the com port (COM35 in my case)
Start the Putty program (on Ubuntu, you might need to run sudo putty) and select "Serial" enter "/dev/ttyUSB0" or "COM35" (or whatever is applicable in your case) in "serial line" option set "speed" as 115200.

and click on "Open", insert SD card onto the micro SD card slot and turn on the power to your Galileo board (via provided DC adapter). After a few moments, a log in prompt should come up, enter "root" and hit enter.

Now you can log in to the Galileo over the network using SSH protocol. For this, you'll need an Ethernet cable. Connect the Galileo and your system using Ethernet cable, directly or through a router/switch. In the serial terminal, type in the following command to know the IP address of the board using which we will SSH into the board.

To establish connection with the board, your computer and the board should have same subnet mask (if you've not connected the board and your system to a router). You can use ifconfig to do that. For example, you could set the IP address of your computer as '169.254.7.1'.
sudo ifconfig eth0 169.254.7.1 up
Start putty again and this time select 'SSH' and enter the IP address in the field below 'Host Name' and click on 'Open'.

You'll have to add the key if this is the first time you are logging in via the SSH.

Type 'root' in the screen that appears next and hit enter key.

You may now use this console and disconnect the USB serial cable if you wish to use SSH instead of the serial terminal.
Well, this was the easiest path that you could take to get to the console on the Galileo and now for the hard way.
Getting to the console - The hard way (or Without the serial cable):
Let's say you do not have a serial USB cable or you do not want to use one and still be able to use the console on our Galileo. Most often, you'll have an Ethernet cable but not the serial USB cable. You can easily get to the console over the SSH using the Ethernet cable but there is a small problem here, there is no definite way to know the IP address of your board (especially if you've connected the Galileo to the router). There is a way to do just that. We are going to make this work by writing an Arduino sketch that will print out the IP address. First, you'll need the Arduino Intel IDE which you can get it from here. Follow this getting started guide to know how you can upload your sketches. Download the sketch from here. Extract the zip file and open the sketch in the Intel Arduino IDE.

Upload the sketch once done, start the "Serial monitor" tool by clicking on the top right corner of the IDE.

You should see the IP address being printed.

You can use any serial program to see this message. You will have to open the device /dev/ttyACMx (or respective com port if you are on Windows) baud rate does not matter since the other end is just pretending to be serial channel over USB.Now that you have the IP address, you can SSH into the Intel Galileo with it and you would have access to the Linux system running on the Intel Galileo.
Connect the black wire end of the cable to "GND" on the Galileo.
Use any of the serial terminal emulator programs to login to the Galileo. On Linux, you can use putty, gtktrem, minicom on Windows you can use Putty, RealTerm,Tera Term.
Following instructions apply to putty
On Ubuntu, you can install putty by running the command
sudo apt-get install putty
For Windows, download putty from here.
Connect the USB converter cable and run the following command to know by what name the cable got recognized in the /dev/ folder.
ls /dev/ttyUSB*
For example, in my case, it got recognized as ttyUSB0. Some converters might show up as ttyACM instead of ttyUSB. In that case, you'll have to use ls /dev/ttyACM* instead of the above command to find out the device file.
If you are on Windows, right click on "My computer->device manager->ports" and note down the com port (COM35 in my case)

Start the Putty program (on Ubuntu, you might need to run sudo putty) and select "Serial" enter "/dev/ttyUSB0" or "COM35" (or whatever is applicable in your case) in "serial line" option set "speed" as 115200.
and click on "Open", insert SD card onto the micro SD card slot and turn on the power to your Galileo board (via provided DC adapter). After a few moments, a log in prompt should come up, enter "root" and hit enter.
Now you can log in to the Galileo over the network using SSH protocol. For this, you'll need an Ethernet cable. Connect the Galileo and your system using Ethernet cable, directly or through a router/switch. In the serial terminal, type in the following command to know the IP address of the board using which we will SSH into the board.
ifconfig
To establish connection with the board, your computer and the board should have same subnet mask (if you've not connected the board and your system to a router). You can use ifconfig to do that. For example, you could set the IP address of your computer as '169.254.7.1'.
sudo ifconfig eth0 169.254.7.1 up
Start putty again and this time select 'SSH' and enter the IP address in the field below 'Host Name' and click on 'Open'.
You'll have to add the key if this is the first time you are logging in via the SSH.
Type 'root' in the screen that appears next and hit enter key.
You may now use this console and disconnect the USB serial cable if you wish to use SSH instead of the serial terminal.
Well, this was the easiest path that you could take to get to the console on the Galileo and now for the hard way.
Getting to the console - The hard way (or Without the serial cable):
Let's say you do not have a serial USB cable or you do not want to use one and still be able to use the console on our Galileo. Most often, you'll have an Ethernet cable but not the serial USB cable. You can easily get to the console over the SSH using the Ethernet cable but there is a small problem here, there is no definite way to know the IP address of your board (especially if you've connected the Galileo to the router). There is a way to do just that. We are going to make this work by writing an Arduino sketch that will print out the IP address. First, you'll need the Arduino Intel IDE which you can get it from here. Follow this getting started guide to know how you can upload your sketches. Download the sketch from here. Extract the zip file and open the sketch in the Intel Arduino IDE.
Upload the sketch once done, start the "Serial monitor" tool by clicking on the top right corner of the IDE.
You should see the IP address being printed.
You can use any serial program to see this message. You will have to open the device /dev/ttyACMx (or respective com port if you are on Windows) baud rate does not matter since the other end is just pretending to be serial channel over USB.Now that you have the IP address, you can SSH into the Intel Galileo with it and you would have access to the Linux system running on the Intel Galileo.
What next?
You can check the following tutorials on using Python to program Galileo:
part0: This post
part1: GPIO output
part2: GPIO input(button)
part3: pwm
part4: adc
part5: Temperature sensor
part1: GPIO output
part2: GPIO input(button)
part3: pwm
part4: adc
part5: Temperature sensor
[…] parts: part0: Getting started on Galileo/Edison part1:GPIO output part2:GPIO input(button) part3:pwm part4:adc part5:Temperature […]
ReplyDelete[…] parts: part0: Getting started on Galileo/Edison part1: GPIO output part2: GPIO input(button) part3: pwm part4: adc part5: Temperature […]
ReplyDelete[…] parts: part0: Getting started on Galileo/Edison part1: GPIO output part2: GPIO input(button) part3: pwm part4: adc part5: Temperature […]
ReplyDelete[…] Getting started with… on Python on Intel Galileo/Edison… […]
ReplyDelete[…] Login to your Edison or Galileo […]
ReplyDelete[…] C on Intel Edison/Ga… on Getting started with Intel Gal… […]
ReplyDelete