In this series of blog posts, I'll be posting on writing Python code on Intel Galileo platform. I'll be using the Grove kit. You can also use a bread board instead of Grove kit.
There are two libraries available on the Intel Galileo for developing applications written in python that need to use sensors, actuators, LEDs etc...
- MRAA: Provides API for interfacing with the GPIOs, ADCs, PWM, SPI, etc... It is basically for interfacing the low level peripherals. It is kind of bare bones, you can use the functions provided by MRAA to drive more complicated peripherals like sensors or you can use...
- UPM: Provides higher levels of abstractions via objects for controlling things like LCDs, temperature sensors etc... It is a level above the MRAA and most of the functions that you might need while interfacing a sensor or LCD are already implemented in UPM.
These libraries are by default installed in the "IoT Linux" image.
As is customary in the the programming world, the very first program has to be hello world and that would be blinking an LED in embedded world.
As is customary in the the programming world, the very first program has to be hello world and that would be blinking an LED in embedded world.
Making the hardware connections:
We are going to blink an LED connected to the port D5 on the Galileo. Connect the longer of the two pins on the LED to D5 through a current limiting resistor (470 ohms) and the shorter one to the "GND".
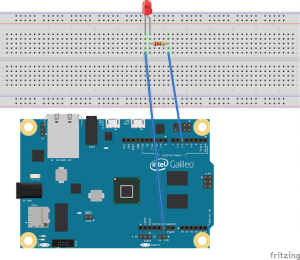
If you are using the Grove kit, then take one of the connectors and connect the one end to the connector labeled "D5" and the other end to the "LED socket" module from the Grove kit. Insert the longer pin of the LED into the connector labeled "+" and the other pin into connector labeled "-" (GND).

Writing the script:
You might want to refer to this post on things like connecting to the Galileo over the SSH.
Once you have access to the console, you can start your coding. Using your favorite editor (mine is emacs and hence we will go through editing the files with that first).
Fire up the emacs and issue open file chord (ctrl-x ctrl-f) and type the following:
The above syntax is for accessing the remote files (the file that we want to create and edit has to be on Galileo). The emacs is running on your host PC.
or if you want to use vi editor which is installed in the Galileo itself, you need to type "vi " at the command prompt of the Galileo console and press key 'i' to start editing.
and type in the following code:
https://gist.github.com/navin-bhaskar/b6d91823ffec9ea7e25d
To run the code, type in the following in the Galileo console:
If you have connected the LED to D5, you should now see the LED blink.
Now you know what the code does, it is time to know how it does that.
The first thing is to bring in the "mraa" module in. This library let's us control the GPIO. Next we import the "time" module that will provide us with the "sleep" method to be used for blinking effect.
Next, we create an instance of the D5 GPIO pin that provides us with the methods to control the selected GPIO pin. In this example we will be using the methods "dir" and "write"
Set the direction of the GPIO port we want to control as "OUT" since we want to OUTput the voltage rather than INputing it. The voltage that we output is applied across the LED and this controls the state of that LED.
Then in an infinite loop, the LED is turned on and off depending on the state of the flag "ledState" which is toggled every cycle. To turn on the led the "write" method is used. To "write", if argument sent is "1" then the high logic level is applied at the selected pin causing the LED to turn on and writing "0" causes the LED to switch off.
Other parts:
part0: Getting started on Galileo/Edison
part1:GPIO output
part2: GPIO input(button)
part3: pwm
part4: adc
part5: Temperature sensor
part6: Light sensor
We are going to blink an LED connected to the port D5 on the Galileo. Connect the longer of the two pins on the LED to D5 through a current limiting resistor (470 ohms) and the shorter one to the "GND".
If you are using the Grove kit, then take one of the connectors and connect the one end to the connector labeled "D5" and the other end to the "LED socket" module from the Grove kit. Insert the longer pin of the LED into the connector labeled "+" and the other pin into connector labeled "-" (GND).
Writing the script:
You might want to refer to this post on things like connecting to the Galileo over the SSH.
Once you have access to the console, you can start your coding. Using your favorite editor (mine is emacs and hence we will go through editing the files with that first).
Fire up the emacs and issue open file chord (ctrl-x ctrl-f) and type the following:
/ssh:root@your_boards_ip_addr:/home/root/blink.py
The above syntax is for accessing the remote files (the file that we want to create and edit has to be on Galileo). The emacs is running on your host PC.
or if you want to use vi editor which is installed in the Galileo itself, you need to type "vi " at the command prompt of the Galileo console and press key 'i' to start editing.
and type in the following code:
https://gist.github.com/navin-bhaskar/b6d91823ffec9ea7e25d
To run the code, type in the following in the Galileo console:
python blink.py
If you have connected the LED to D5, you should now see the LED blink.
Now you know what the code does, it is time to know how it does that.
The first thing is to bring in the "mraa" module in. This library let's us control the GPIO. Next we import the "time" module that will provide us with the "sleep" method to be used for blinking effect.
import mraa # For accessing the GPIO
import time # For sleeping between blinks
Next, we create an instance of the D5 GPIO pin that provides us with the methods to control the selected GPIO pin. In this example we will be using the methods "dir" and "write"
LED_GPIO = 5 # we are using D5 pin
blinkLed = mraa.Gpio(LED_GPIO) # Get the LED pin object
Set the direction of the GPIO port we want to control as "OUT" since we want to OUTput the voltage rather than INputing it. The voltage that we output is applied across the LED and this controls the state of that LED.
blinkLed.dir(mraa.DIR_OUT) # Set the direction as output
Then in an infinite loop, the LED is turned on and off depending on the state of the flag "ledState" which is toggled every cycle. To turn on the led the "write" method is used. To "write", if argument sent is "1" then the high logic level is applied at the selected pin causing the LED to turn on and writing "0" causes the LED to switch off.
while True:
    if ledState == False:
        # LED is off, turn it on
        blinkLed.write(1)
        ledState = True # LED is on
    else:
        blinkLed.write(0)
        ledState = False
Other parts:
part0: Getting started on Galileo/Edison
part1:GPIO output
part2: GPIO input(button)
part3: pwm
part4: adc
part5: Temperature sensor
part6: Light sensor
[…] next? You can check the following tutorials on using Python to program Galileo: part0: This post part1:GPIO output part2:GPIO input(button) part3:pwm part4:adc part5:Temperature […]
ReplyDelete[…] parts: part0: Getting started on Galileo/Edison part1:GPIO output part2:GPIO input(button) part3:pwm part4:adc part5:Temperature […]
ReplyDelete[…] parts: part0: Getting started on Galileo/Edison part1: GPIO output part2: GPIO input(button) part3: pwm part4: adc part5: Temperature […]
ReplyDelete[…] parts: part0: Getting started on Galileo/Edison part1: GPIO output part2: GPIO input(button) part3: pwm part4: adc part5: Temperature […]
ReplyDelete[…] Python on Intel Gali… on Python on Intel Galileo/Edison… […]
ReplyDelete