In this blog post, we are going to look into the ways of mraa functions used for controlling the PWM module available on the Galileo/Edison. In this tutorial, we will using PWM to control the intensity with which the LED glows, connected to port D5. The LED starts of with lowest intensity and then gradually increase the intensity until it reaches the maximum intensity and then decreases the intensity gradually until the LED is at the lowest intensity and the cycle continues.
Showing posts with label mraa. Show all posts
Showing posts with label mraa. Show all posts
Sunday, February 21, 2016
Wednesday, December 30, 2015
C/C++ on Intel Edison/Galileo – part2: Buttons
In this post, we will be looking at using mraa library on C for interfacing with a button. For this example, the button will be used to turn on and off an LED connected to the Edison/Galileo. This example is going to be very similar to the previous one. The only difference being that the state of the LED is controlled by a button instead of the program running on Edison/Galileo itself.
Friday, November 13, 2015
C on Intel Edison/Galileo - part1
In this series of blog posts, I’ll be posting on writing 'C' code on Intel Edison/Galileo platform. I’ll be using the Grove kit. You can also use a bread board instead of Grove kit.
There are two libraries available on the Intel Edison/Galileo for developing applications written in C that need to use sensors, actuators, LEDs etc…
There are two libraries available on the Intel Edison/Galileo for developing applications written in C that need to use sensors, actuators, LEDs etc…
- MRAA: Provides API for interfacing with the GPIOs, ADCs, PWM, SPI, etc… It is basically for interfacing the low level peripherals. It is kind of bare bones, you can use the functions provided by MRAA to drive more complicated peripherals like sensors or you can use…
- UPM: Provides higher levels of abstractions via objects for controlling things like LCDs, temperature sensors etc… It is a level above the MRAA and most of the functions that you might need while interfacing a sensor or LCD are already implemented in UPM.
Thursday, September 3, 2015
Python on Intel Galileo/Edison - Part6: Light sensor
In this post, we will be using the upm library to interface the Grove Light sensor with the Galileo/Edison using python.
The light sensor is made up of primarily of LDR and opamp:
[caption id="attachment_382" align="aligncenter" width="319"]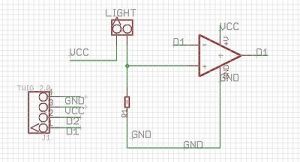 The Grove light sensor (image: seeed studio)[/caption]
"LDR" stands for light dependent resistor (in above schematic, it is marked as "LIGHT") as the name suggests, it is made up of a material that changes it resistance depending on the intensity of the ambient light.
The light sensor is made up of primarily of LDR and opamp:
[caption id="attachment_382" align="aligncenter" width="319"]
 The Grove light sensor (image: seeed studio)[/caption]
"LDR" stands for light dependent resistor (in above schematic, it is marked as "LIGHT") as the name suggests, it is made up of a material that changes it resistance depending on the intensity of the ambient light.
Wednesday, April 8, 2015
Python on Intel Galileo/Edison - Part 5:Temperature sensor with mraa and upm
The temperature sensor that we are gong to use for this post is from Grove. This sensor outputs the voltage that represents the temperature hence we will need the ADC module on the Intel Galileo/Edison to interface with this peripheral.
Python on Intel Galileo/Edison - Part 4: ADC
ADC is a peripheral that lets you input an analog signal and gives the digital representation of that analog signal.
The world in which we live in is surrounded by the analog signals. The temperature, sound that hear, the light that we see are all analog signals. If you want to interact or measure these signal in a digital system like Galileo/Edison, you'll have to use ADC a.k.a Analog to Digital Converter.
The world in which we live in is surrounded by the analog signals. The temperature, sound that hear, the light that we see are all analog signals. If you want to interact or measure these signal in a digital system like Galileo/Edison, you'll have to use ADC a.k.a Analog to Digital Converter.
Tuesday, April 7, 2015
Python on Intel Galileo/Edison - Part 3: PWM
In this blog post, we are going to look into the process of using mraa methods for controlling the PWM module available on the Galileo/Edison.
What is PWM?
PWM stands for pulse width modulation. As the name suggests, there is a "pulse" and with "width", we mess("modulation"). The idea here is to change the width of the pulse, resulting in another pulse that meets our needs.
What is PWM?
PWM stands for pulse width modulation. As the name suggests, there is a "pulse" and with "width", we mess("modulation"). The idea here is to change the width of the pulse, resulting in another pulse that meets our needs.
Monday, April 6, 2015
Python on Intel Galileo/Edison - Part 2: Buttons
In this post, we will be writing a Python script to read button inputs.
As in previous post, mraa library is used for handling the GPIO. For this example, the button will be used to turn on and off an LED connected to the Galileo. This example is going to be very similar to the previous one. The only difference being that the state of the LED is controlled by a button instead of the program running on Galileo itself.
As in previous post, mraa library is used for handling the GPIO. For this example, the button will be used to turn on and off an LED connected to the Galileo. This example is going to be very similar to the previous one. The only difference being that the state of the LED is controlled by a button instead of the program running on Galileo itself.
Friday, March 20, 2015
Python on Intel Galileo/Edison - Part 1
In this series of blog posts, I'll be posting on writing Python code on Intel Galileo platform. I'll be using the Grove kit. You can also use a bread board instead of Grove kit.
There are two libraries available on the Intel Galileo for developing applications written in python that need to use sensors, actuators, LEDs etc...
- MRAA: Provides API for interfacing with the GPIOs, ADCs, PWM, SPI, etc... It is basically for interfacing the low level peripherals. It is kind of bare bones, you can use the functions provided by MRAA to drive more complicated peripherals like sensors or you can use...
- UPM: Provides higher levels of abstractions via objects for controlling things like LCDs, temperature sensors etc... It is a level above the MRAA and most of the functions that you might need while interfacing a sensor or LCD are already implemented in UPM.
Python on Intel Galileo/Edison - Part 1
In this series of blog posts, I'll be posting on writing Python code on Intel Galileo platform. I'll be using the Grove kit. You can also use a bread board instead of Grove kit.
There are two libraries available on the Intel Galileo for developing applications written in python that need to use sensors, actuators, LEDs etc...
There are two libraries available on the Intel Galileo for developing applications written in python that need to use sensors, actuators, LEDs etc...
- MRAA: Provides API for interfacing with the GPIOs, ADCs, PWM, SPI, etc... It is basically for interfacing the low level peripherals. It is kind of bare bones, you can use the functions provided by MRAA to drive more complicated peripherals like sensors or you can use...
- UPM: Provides higher levels of abstractions via objects for controlling things like LCDs, temperature sensors etc... It is a level above the MRAA and most of the functions that you might need while interfacing a sensor or LCD are already implemented in UPM.
Subscribe to:
Posts (Atom)