There are two libraries available on the Intel Edison/Galileo for developing applications written in C that need to use sensors, actuators, LEDs etc…
- MRAA: Provides API for interfacing with the GPIOs, ADCs, PWM, SPI, etc… It is basically for interfacing the low level peripherals. It is kind of bare bones, you can use the functions provided by MRAA to drive more complicated peripherals like sensors or you can use…
- UPM: Provides higher levels of abstractions via objects for controlling things like LCDs, temperature sensors etc… It is a level above the MRAA and most of the functions that you might need while interfacing a sensor or LCD are already implemented in UPM.
These libraries are by default installed in the “IoT Linux” image on Galileo and on Edison, these libraries are already installed.
As is customary in the the programming world, the very first program has to be hello world and that would be blinking an LED in embedded world.
Making the hardware connections:
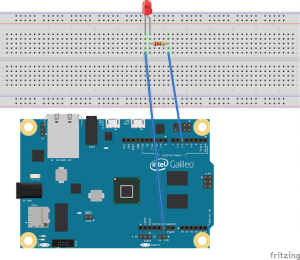
We are going to blink an LED connected to the port D5 on the Galileo. Connect the longer of the two pins on the LED to D5 through a current limiting resistor (470 ohms) and the shorter one to the “GND”.

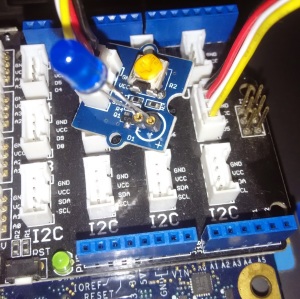
If you are using the Grove kit, then take one of the connectors and connect the one end to the connector labeled “D5” and the other end to the “LED socket” module from the Grove kit. Insert the longer pin of the LED into the connector labeled “+” and the other pin into connector labeled “-” (GND).

Writing the script:
You might want to refer to this post on things like connecting to the Galileo/Edison over the SSH.
Once you have access to the console, you can start your coding. Using your favorite editor (mine is emacs and hence we will go through editing the files with that first).
Fire up the emacs and issue open file chord (ctrl-x ctrl-f) and type the following:
/ssh:root@your_boards_ip_addr:/home/root/blinky.c
The above syntax is for accessing the remote files (the file that we want to create and edit has to be on Galileo/Edison). The emacs is running on your host PC.
or if you want to use vi editor which is installed in the Galileo itself, you need to type “vi ” at the command prompt of the Galileo console and press key ‘i’ to start editing.
and type in the following code:
https://gist.github.com/navin-bhaskar/d487b6b47dc49eba3e6d
Compiling:
To compile the '.c' file enter the following command in the console:
gcc -o blinky blinky.c -lmraa
The '-o' flag tells the gcc compiler to generate the compiled application by name 'blinky' 'blinky.c' is the name of the input file written in 'c' programming language and '-l' is linker flag indicating the compiler to link the application against the 'mraa' library combined, they form the string '-lmraa'. mraa is the library where all the code related to mraa functions are located.
Run the application using following command:
./blinky
You should see the LED connected to port D5 blink. To exit the application any time, hit 'ctl+c'
The details:
The first thing to do in the mraa 'c' application is to bring in the function deceleration (required by the C compiler to know how to call the mraa function) such as mraa_init() and defines used to name various numerical constants such as MRAA_GPIO_OUT that represent things that mraa functions can understand.
#include <mraa.h>
Next, we create what is known as "gpio context" by name ledPin. This is a generic gpio representation when initialized would act as gateway for the programmer to using the selected pin.
mraa_gpio_context ledPin;
Next, we initialize the mraa library:
mraa_init();Next the required pin is initialized:
ledPin = mraa_gpio_init(LED_PIN);This would set up the pin as general purpose input output pin functionality rather than i2c, spi pins functions.
Next we set the pin as input:
mraa_gpio_dir(ledPin, MRAA_GPIO_OUT);Then within a while(1) loop, the LED is set on using mraa_gpio_write(ledPin, 1) and off using mraa_gpio_write(ledPin, 0).
The function mraa_gpio_write() would set the given pin (first argument) to supplied voltage level (second argument). Sleep function delays the execution by number of seconds passed as argument:
while(1)
{
    mraa_gpio_write(ledPin, 1);
    sleep(1);
    mraa_gpio_write(ledPin, 0);
    sleep(1);
}
[…] an LED connected to the Edison/Galileo. This example is going to be very similar to the previous one. The only difference being that the state of the LED is controlled by a button instead of the […]
ReplyDelete